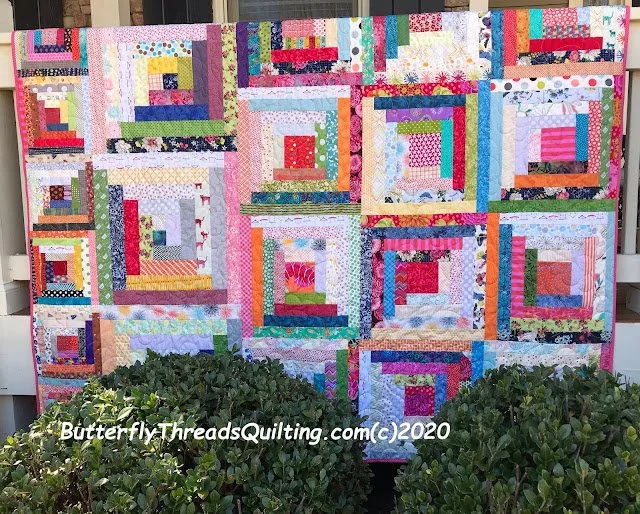
Log Cabin Quilt …
I made this quilt from a photo of a vintage quilt that I have had hanging in my office for years. I didn't have any instructions, so I decided to make it simple and easy, in spite of all the awkward angles and clearly wonky seams, it’s just easier to make a simple plan in my opinion. I chose 3 sizes of blocks that would all be divisible by the same number so I could line up the rows of blocks and have all the rows the same length.
The first row has 8 blocks that are 10'' square.
The second row has 4 blocks that are 20" square.
The next 3 rows have 5 blocks each that are 16" square.
Each of the log cabin blocks is the exact same construction. The math for cutting varies to make the sizes different. But once you've sewn one block, all the others go together the exact same way!
Cutting Instructions
Cutting for the 10" blocks (make 8)
NOTE: these blocks have an extra round than shown in the layout.
Center square-
cut 8 squares 2 1/2'' x 2 1/2''
Light strips-
cut 8 strips 1 1/2" x 2 1/2"
cut 8 strips 1 1/2'' x 3 1/2"
cut 8 strips 1 1/2'' x 4 1/2"
cut 8 strips 1 1/2'' x 5 1/2"
cut 8 strips 1 1/2'' x 6 1/2"
cut 8 strips 1 1/2'' x 7 1/2"
cut 8 strips 1 1/2'' x 8 1/2"
cut 8 strips 1 1/2'' x 9 1/2"
Dark strips-
cut 8 strips 1 1/2" x 3 1/2"
cut 8 strips 1 1/2'' x 4 1/2"
cut 8 strips 1 1/2'' x 5 1/2"
cut 8 strips 1 1/2'' x 6 1/2"
cut 8 strips 1 1/2'' x 7 1/2"
cut 8 strips 1 1/2'' x 8 1/2"
cut 8 strips 1 1/2'' x 9 1/2"
cut 8 strips 1 1/2'' x 10 1/2"
Cutting for the 20" blocks (make 4)
Center square-
cut 4 squares 5 1/2'' x 5 1/2''
Light strips-
cut 4 strips 3" x 5 1/2"
cut 4 strips 3'' x 8"
cut 4 strips 3" x 10 1/2"
cut 4 strips 3" x 13"
cut 4 strips 3" x 15 1/2"
cut 4 strips 3" x 18"
Dark strips-
cut 4 strips 3'' x 8"
cut 4 strips 3" x 10 1/2"
cut 4 strips 3" x 13"
cut 4 strips 3" x 15 1/2"
cut 4 strips 3" x 18"
cut 4 strips 3" x 20 1/2"
Cutting for the 16" blocks (make 15)
Center square-
cut 15 squares 4 1/2'' x 4 1/2''
Light strips-
cut 15 strips 2 1/2" x 4 1/2"
cut 15 strips 2 1/2'' x 6 1/2"
cut 15 strips 2 1/2'' x 8 1/2"
cut 15 strips 2 1/2'' x 10 1/2"
cut 15 strips 2 1/2'' x 12 1/2"
cut 15 strips 2 1/2'' x 14 1/2"
Dark strips-
cut 15 strips 2 1/2'' x 6 1/2"
cut 15 strips 2 1/2'' x 8 1/2"
cut 15 strips 2 1/2'' x 10 1/2"
cut 15 strips 2 1/2'' x 12 1/2"
cut 15 strips 2 1/2'' x 14 1/2"
cut 15 strips 2 1/2" x 16 1/2"
Sewing Instructions
Sewing the Blocks
Sew the shortest light strip to the center square. Press toward the strip.
Rotate the unit to the right 90 degrees.
Sew the next light strip to the unit. Press toward the strip.
Rotate the unit to the right 90 degrees.
Sew the shortest dark strip to the center square. Press toward the strip.
Rotate the unit to the right 90 degrees.
Sew the next dark. strip to the unit. Press toward the strip.
Continue until all strips are added.
Take care to keep all of the strips on one side of the blocks and all the darks on the other.
The strip you are adding should be the exact length needed.
If not, check your seam allowances and adjust accordingly.
Always press toward the most recently added strip.
Trip blocks to the correct size if needed.
Assemble the Quilt
Arrange the blocks as shown in the diagram.
Sew the 10" blocks into a row.
Sew the 20" blocks into a row.
Sew the 16" blocks into 3 rows of 5 blocks each.
Sew the rows together.
Use your preferred method for pressing.
Layer, Baste, Quilt and Bind!
For a download version of the pattern, click HERE.
I hope this helps you use up some scraps and strips! Please make one for yourself, or even better, make one to give away, like I did! Now it’s time for me to make another to keep, maybe in a Christmas color theme this time? Either way...
Enjoy every stitch!
Diane


